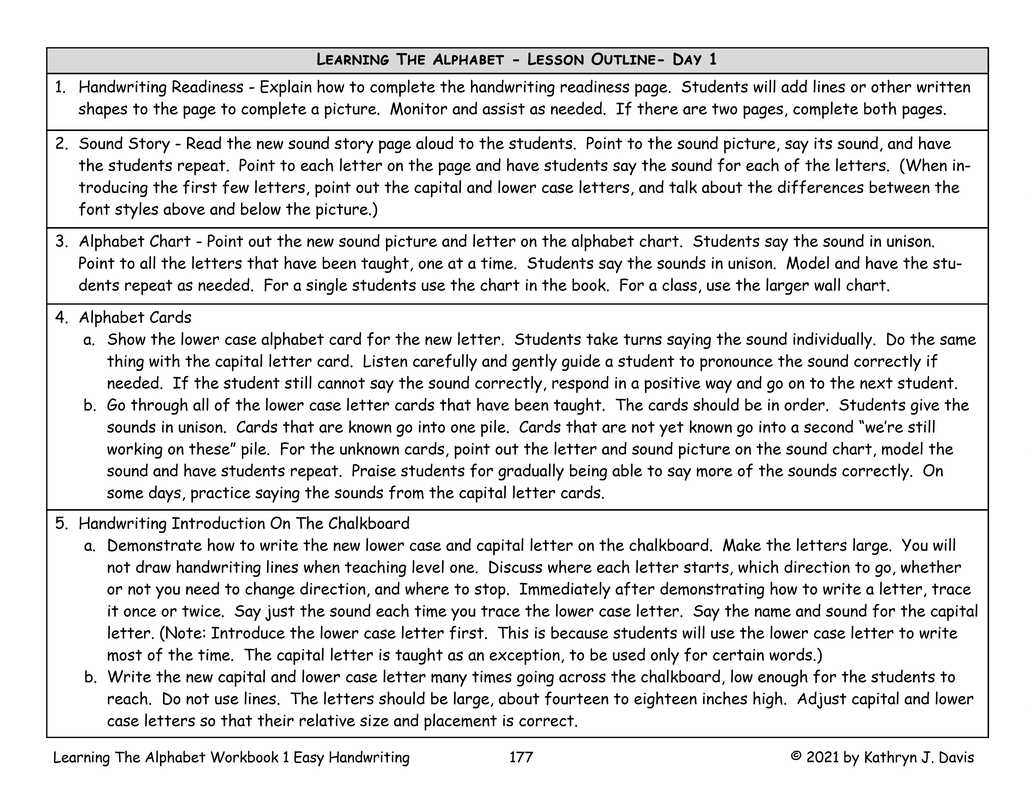
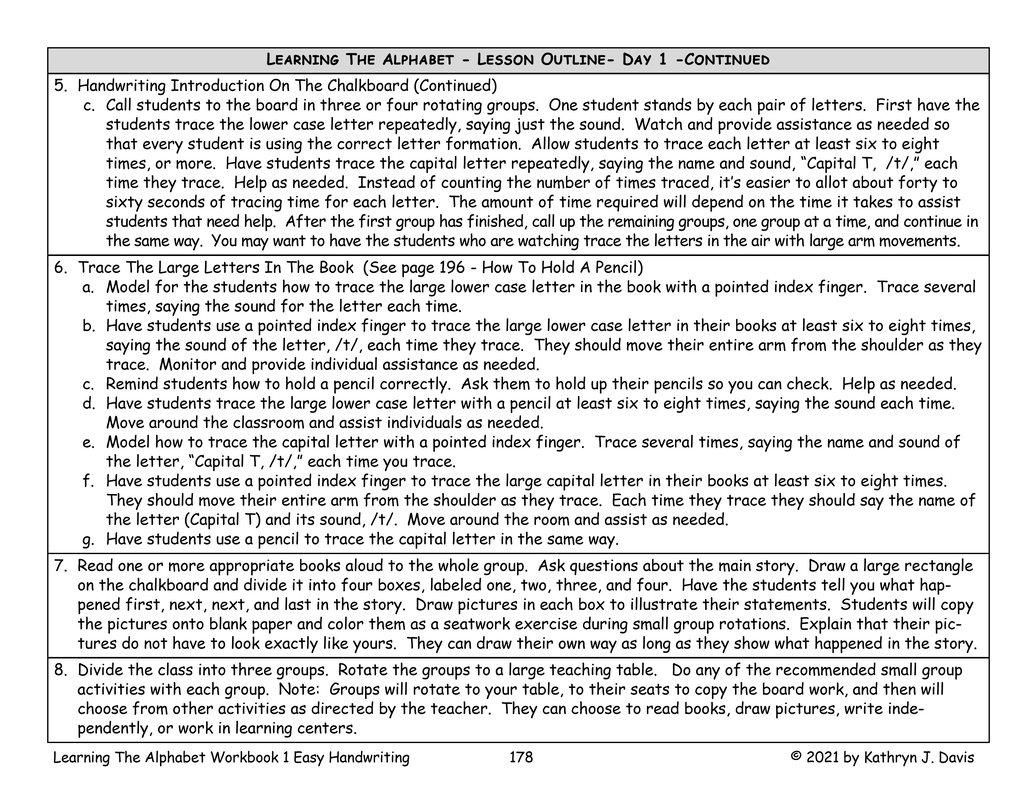
If you can't see the main menu at the top of the page, you can click any of the main menu headings here:
A Sequential Phonics Program - Program Overview - PDF Files - Pictures - Audio - Video - Reading Street - Blog.
A Sequential Phonics Program - Program Overview - PDF Files - Pictures - Audio - Video - Reading Street - Blog.
Information About Level 1 - Learning The Alphabet
This section explains the skills taught in the Level 1 materials. To see the PDF files for these materials, hover over PDF FILES on the main menu and then click on LEVEL 1 - LEARNING THE ALPHABET PDFS.
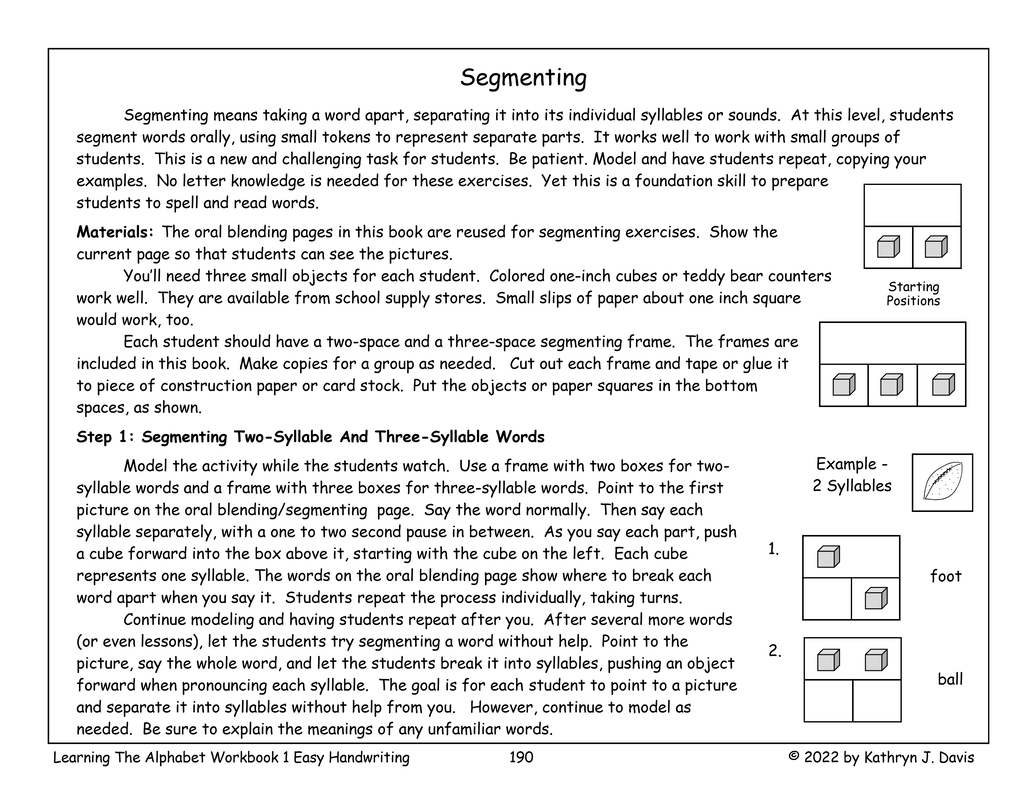
General Comments
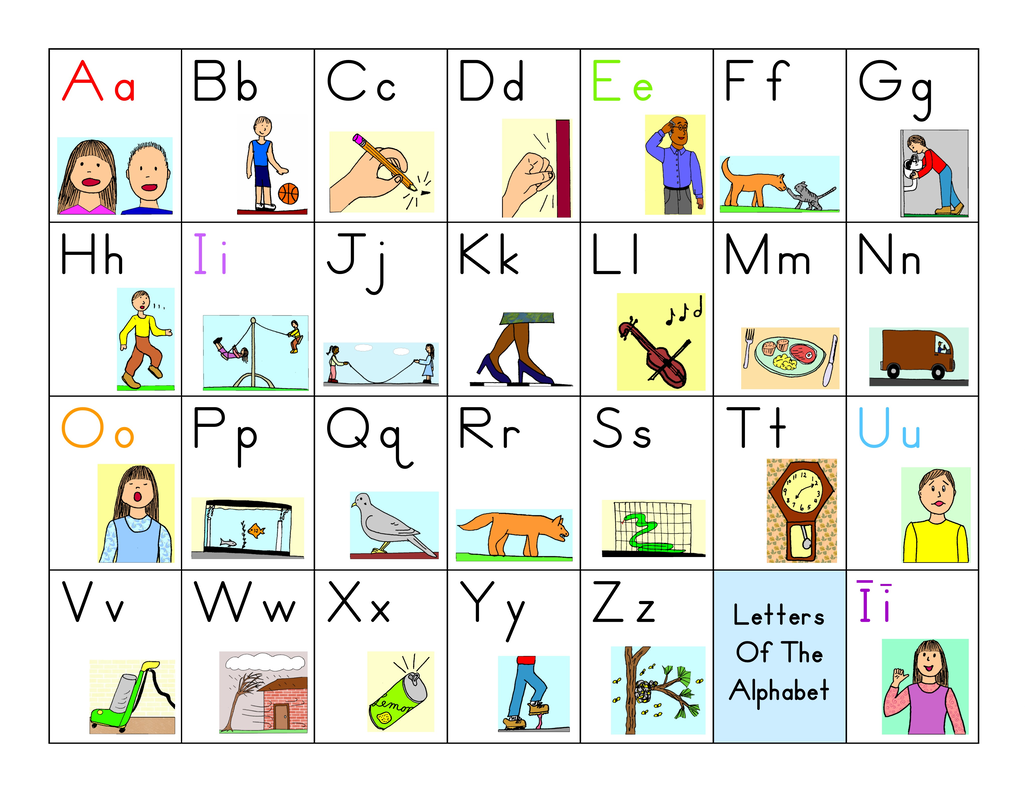
- Students learn to recognize the letters of the alphabet and associate them with the sounds they represent. They listen to the teacher read a sound story aloud. The story contains pictures that represent all of the sounds in the English language. Students learn the sound for each picture and the capital and lower case letter that represents each sound.
- To develop pencil skills and eye-hand coordination, students complete one or two picture pages before learning the letter formation each new letter. They trace shapes or lines or add their own on the picture page, using the strokes that will needed to write the next letter introduced.
- To get a feel for the letter formation for each new letter, students trace large and small alphabet letters in their books while saying their sounds. Students at this level are not expected to write the letters independently. Students study the letters that are easiest to write first. Letters that are more challenging to write and letters that are less commonly used in words are taught later. After learning to form the basic strokes while studying the first letters, students will be better able to combine those strokes to form the more complicated letters that are taught later. The letters are taught in this order: T t, I i, H h, L l, N n, W w, U u, B b, M m, R r, F f, X x, E e, S s, J j, O o, C c, D d, A a, V v, G g, P g, K k, Y y, Qu, qu, Z z.
- Each day students review the sound for all of the letters they have learned from both sound charts and sound cards. The sound charts show the alphabet letters with the associated sound pictures. If students forget a letter or sound, the teacher models the sound for them. Then the students repeat. It is not necessary for students to master every letter before continuing with the following lessons.
- Students are introduced to the concept of beginning and ending sounds and rhyming words using picture pages in their books.
- Students do easy oral blending exercises, in which they listen to individual syllables or sounds and put them together mentally to form words. And they do easy segmenting exercises in which they listen to words and break them apart into their individual sounds. The oral blending and rhyming exercises are done using picture pages.
- Students play a variety of table games with the teacher to help them remember each letter and the sound it represents.
- Students listen to the teacher read eight print awareness lessons aloud.
- The teacher reads aloud to the students daily from a variety of appropriate children's trade books, obtained separately.
How Does Level One Fit Into The Sound City Reading Program?
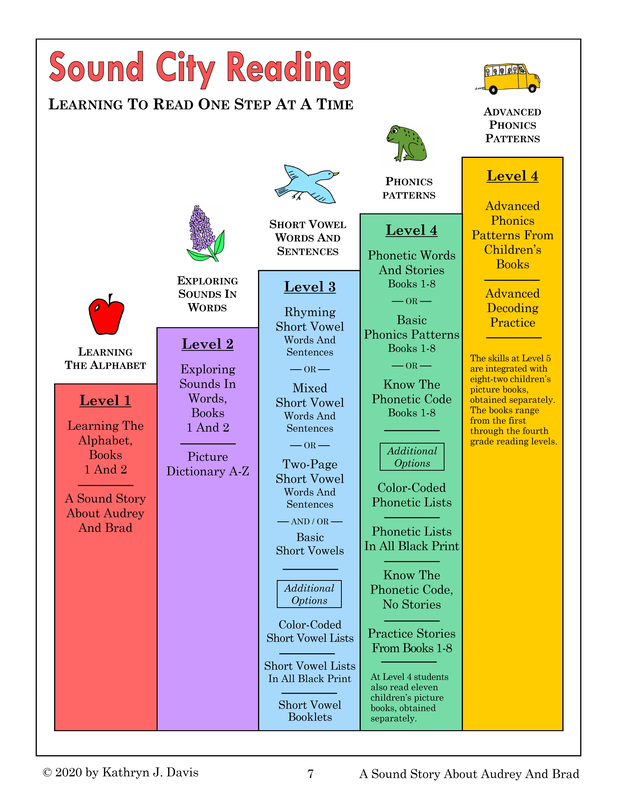
Level one is shown in red on the charts below. It is the beginning level in the Sound City Reading program. Click on any chart to enlarge it. The books used at each level are listed on the charts.
Level 1 - Red - Learning The Alphabet (Readiness)
Level 2 - Purple - Exploring Sounds In Words (Advanced Readiness)
Level 3 - Blue - Short Vowel Words And Sentences
Level 4 - Green - Phonetic Words And Stories
Level 5 - Golden Yellow - Advanced Phonics Patterns From Children's Books
Level 2 - Purple - Exploring Sounds In Words (Advanced Readiness)
Level 3 - Blue - Short Vowel Words And Sentences
Level 4 - Green - Phonetic Words And Stories
Level 5 - Golden Yellow - Advanced Phonics Patterns From Children's Books
|
Step Chart
|
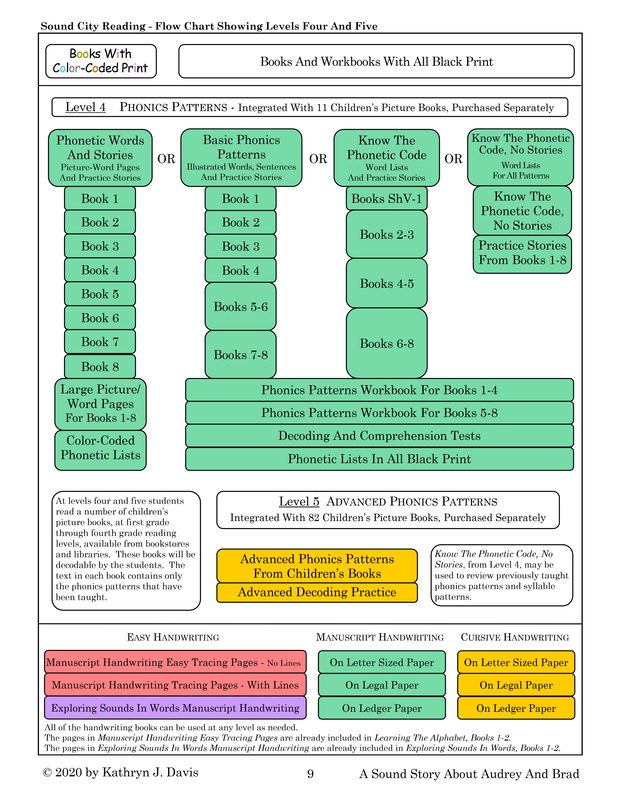
Flow Chart
|

What Skills Are Taught At Level One?
|
Handwriting Readiness
Letter / Sound Association Letter Formation Letter Recognition Rhyming Awareness |
Beginning And Ending Sound Awareness
Oral Blending - Listen to separate sounds/syllables and put them together to form a word. Segmenting - Listen to a word and say the separate syllables or sounds in the word. Print Awareness - Understand how print works in written materials. |
The level one materials provide instruction to develop the beginning skills needed to prepare students to read and write, as listed above. The teacher works directly with the students as they progress through each day's lesson, providing support as needed. Students are not expected to do any of the worksheets or activities on their own.
A sequence chart, teaching schedule, and daily lesson outlines are included at the end of each book.
The student pages are to be done in the order in which they appear in the book. Brief instructions are included on each page.
The order in which the letters are introduced has been carefully considered. Letters that are the easiest to write are taught first. These include t, i, h, l, and n. Letters that are more difficult to write are taught later. These include a, g, p, k, y, and q. This allows students to develop confidence and fine motor skills while writing the initial letters. They will then find it easier to write the more complex letters.
Students learn the letter formation for each new capital and lower case letter over a period of several days. Students at level one are not expected to write the letters independently. They trace large and small letter outlines to help them develop the coordination needed to eventually write the letters on their own. Each time they trace a lowercase letter, students say the letter sound, "/t/." Each time they trace a capital letter, they say the letter name and sound, "Capital T, /t/."
At level one, it is not necessary for students master the material when they are first introduced to it. Students can take time to learn. With the teacher's guidance they will gradually master the skills over a period of time.
It is expected that the teacher will read aloud to the students daily from a variety of materials and that students will have time to draw, paint, build with construction materials, and so on, each day.
Who Should Use Level One?
Students who are starting kindergarten.
First graders who are not yet ready to start Level 2 or Level 3.
Adults who are starting to learn English as a second language.
First graders who are not yet ready to start Level 2 or Level 3.
Adults who are starting to learn English as a second language.
This level works well for students at the early kindergarten level. It can also be used for students at the beginning of first grade when needed. Students should begin here if they do not know all of the letters of the alphabet and their sounds.
It is not necessary for students at this level to be able to remember each letter and sound, even after they have been introduced. They will get a lot of supported practice as they work through the books and activities, and their skills will improve with time.
Students will trace large and small letter outlines with guidance from the teacher to help them develop handwriting skills and become familiar with the correct letter formation. They are not expected to be able to write the letters independently at this level.
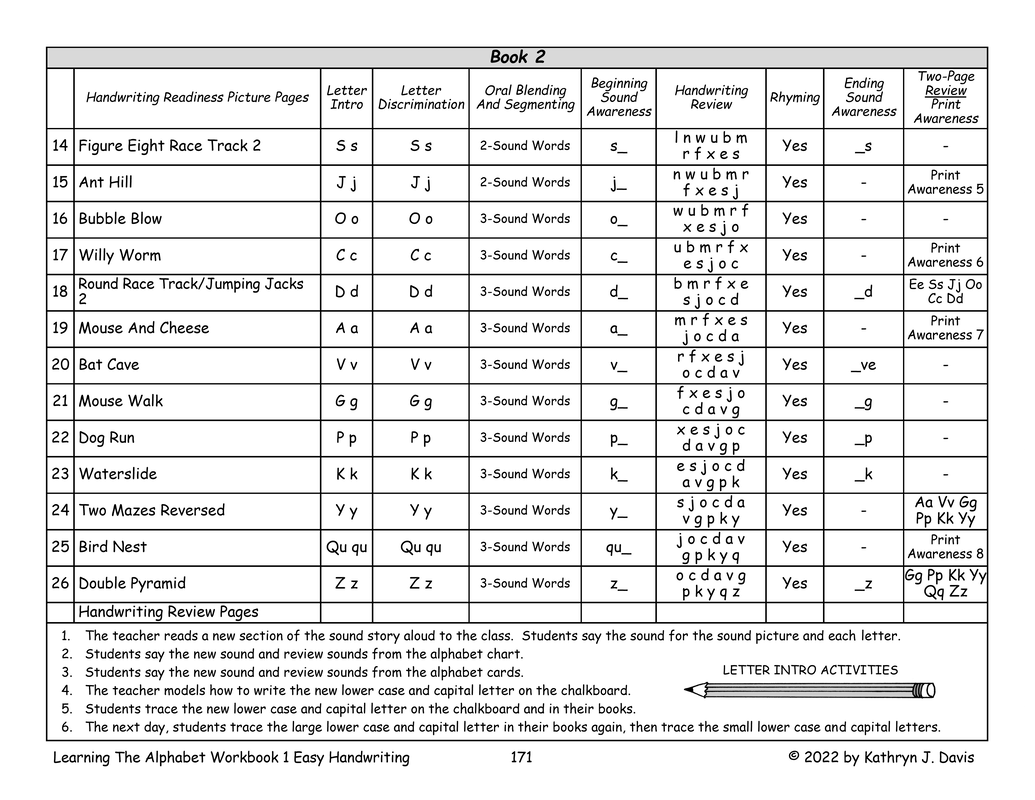
Level One Sequence Charts - For Book 1 And Book 2
Click on any chart to enlarge it.
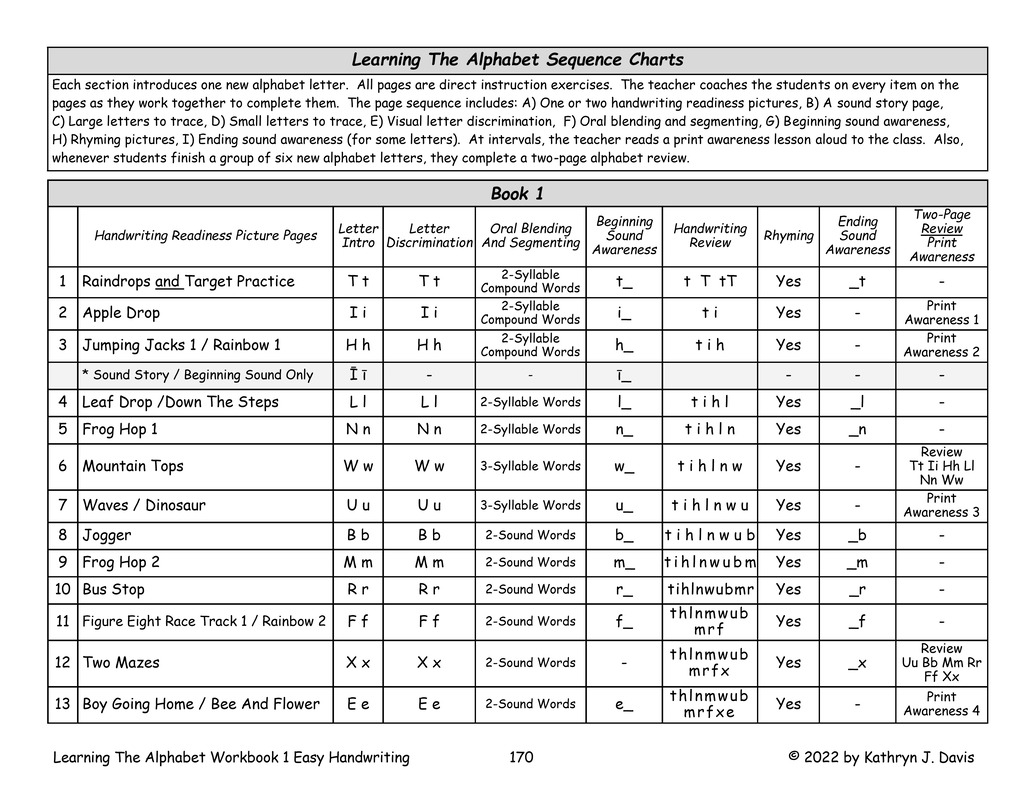
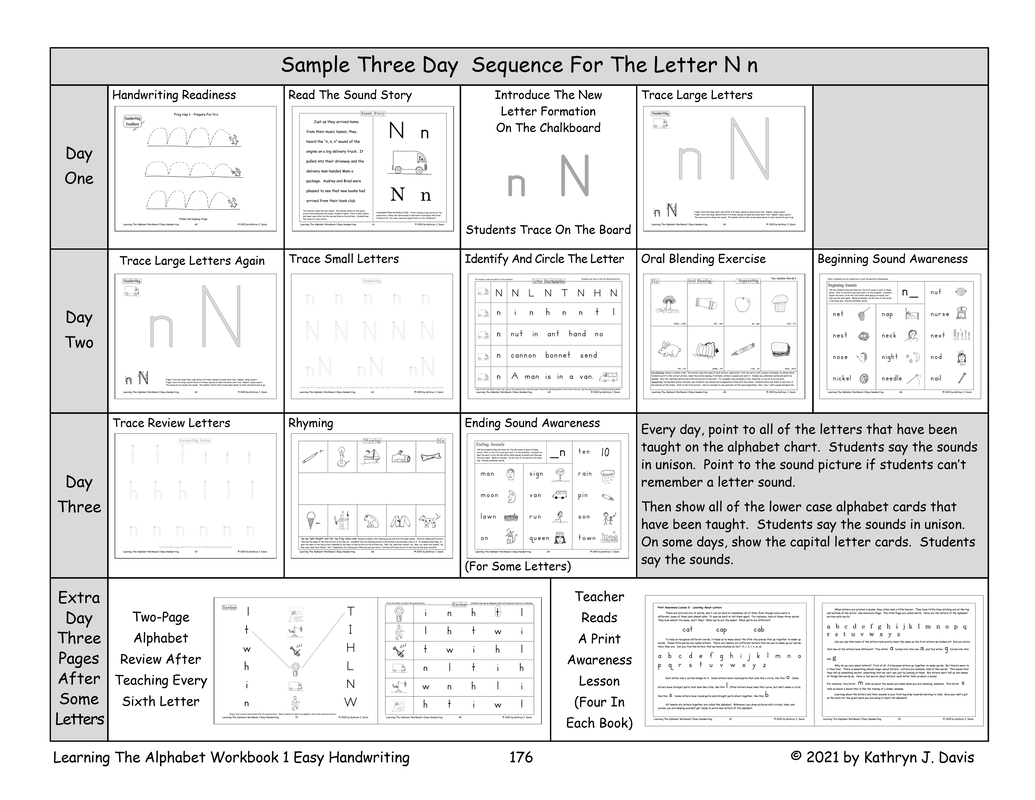
Level 1 - Sample Three-Day Sequence
Level 1 - Lesson Outline - Day 1
Level 1 - Lesson Outline - Day 2
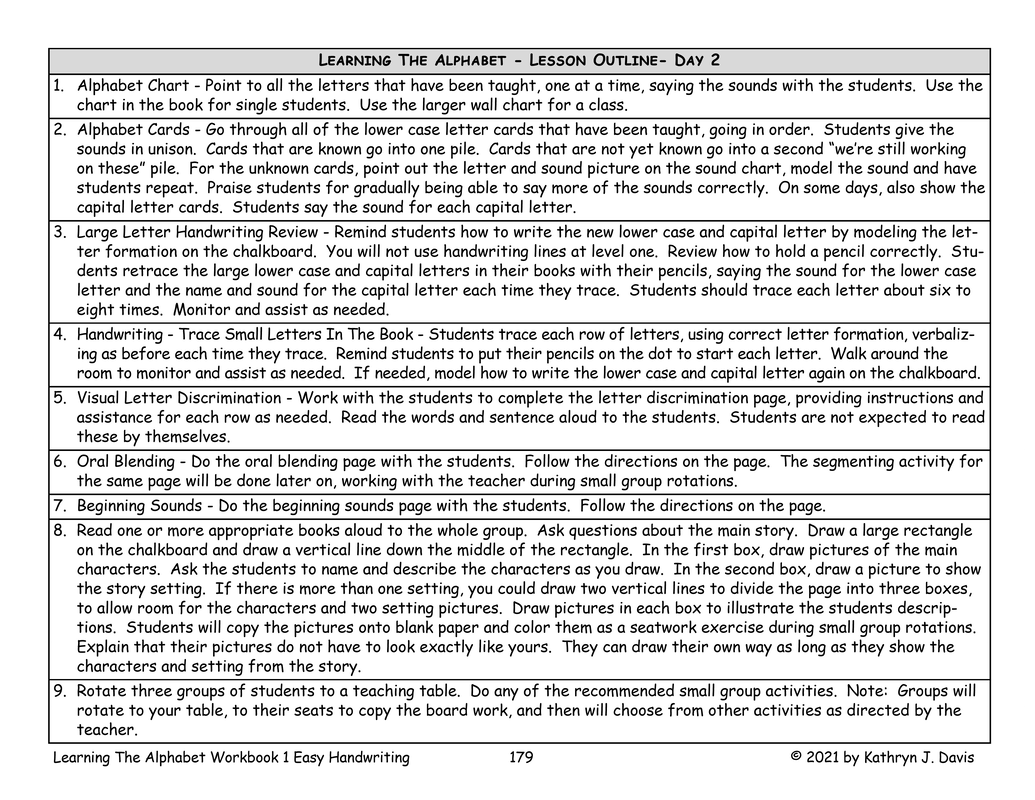
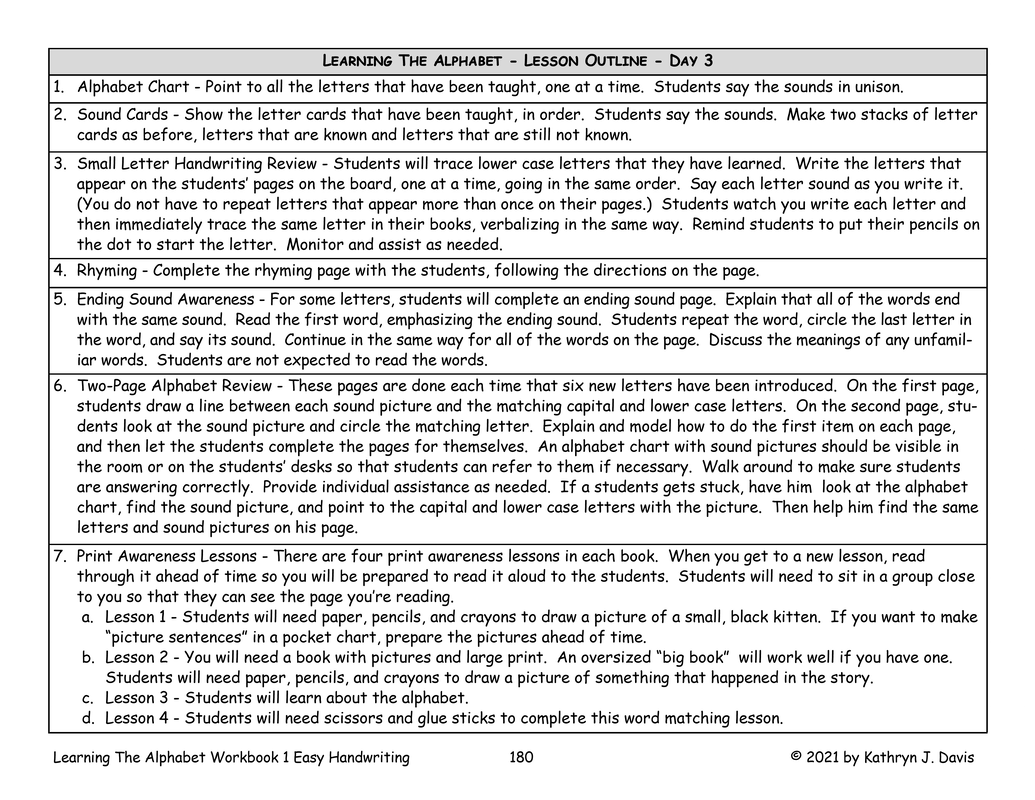
Level 1 - Lesson Outline - Day 3
Level 1 - Daily Small Group Activities
|
Which Books Are Used At Level 1?
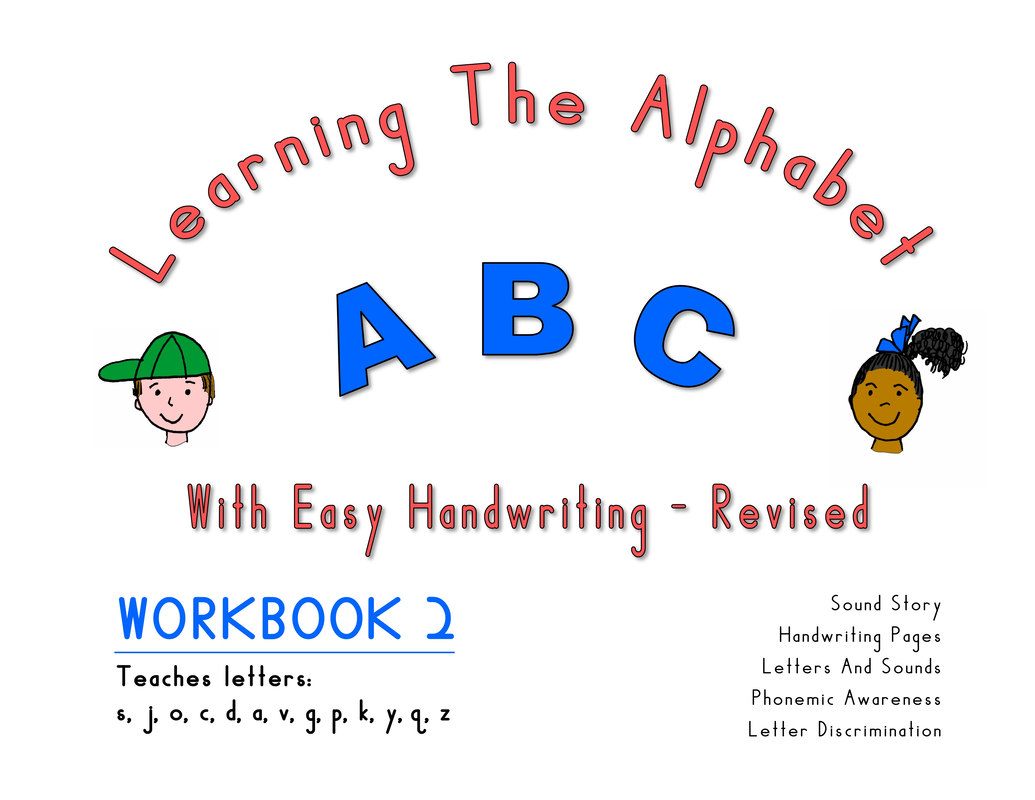
Learning The Alphabet, Workbook 1 And 2
These are the student books for Level 1. They teach all of the skills listed above, including handwriting. The pages include part one of the sound story, which teaches the letters of the alphabet and their sounds.
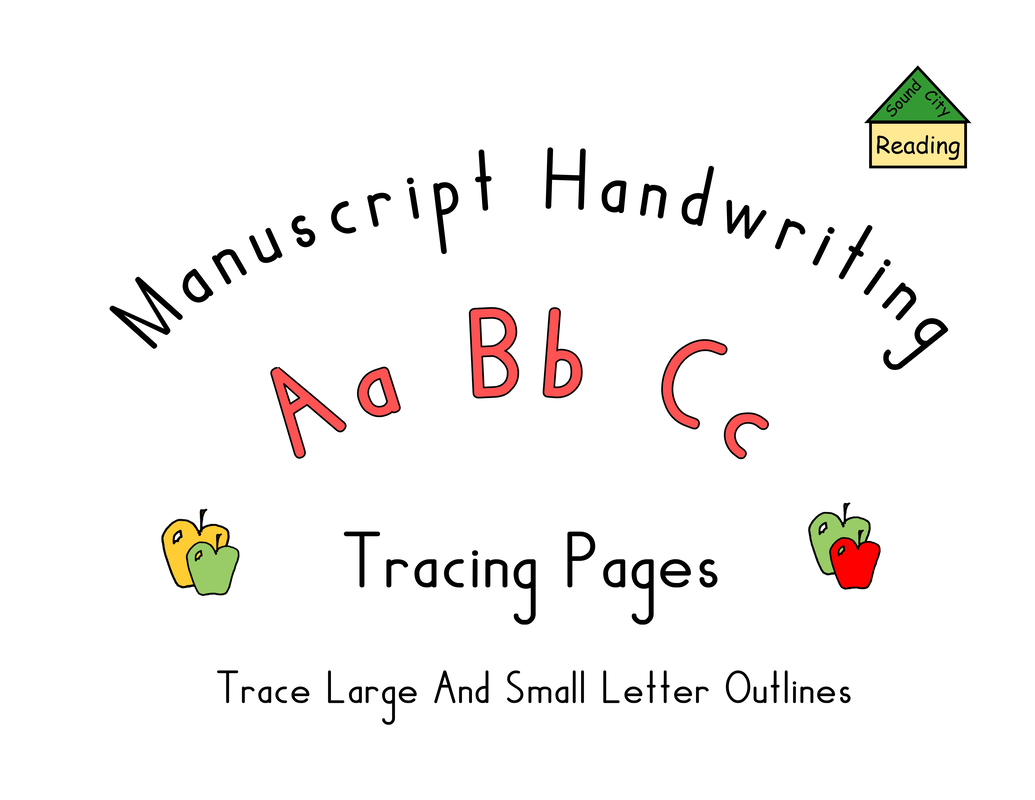
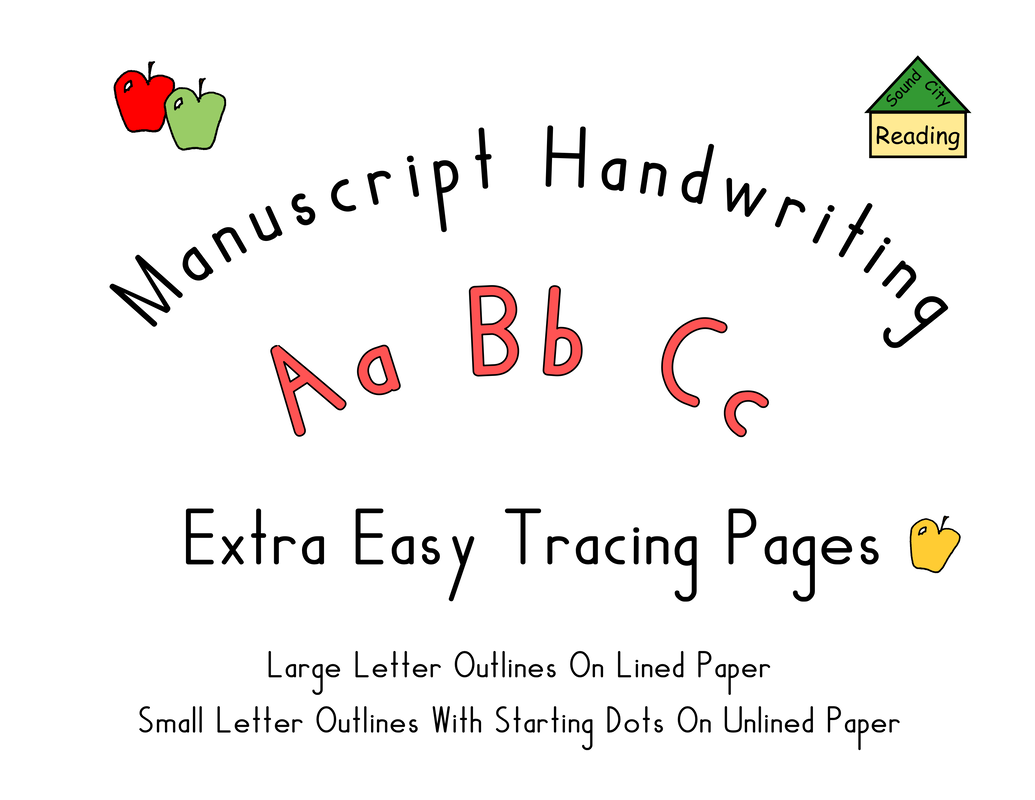
Level One Handwriting Books
These books contain just the handwriting pages from the Learning The Alphabet books. They can be used with older students who need extra help with handwriting. Books are available with or without handwriting lines.
|
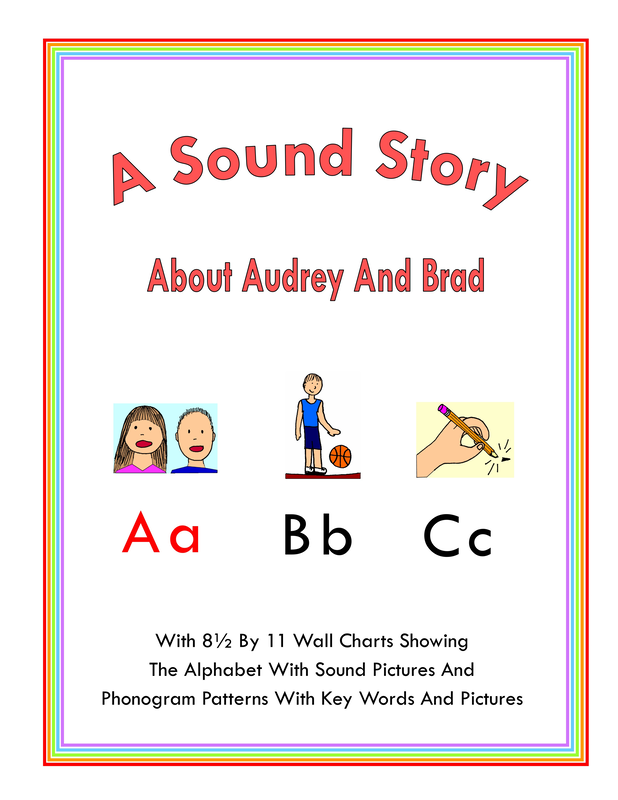
Other Books Used At Level 1
A Sound Story About Audrey And Brad
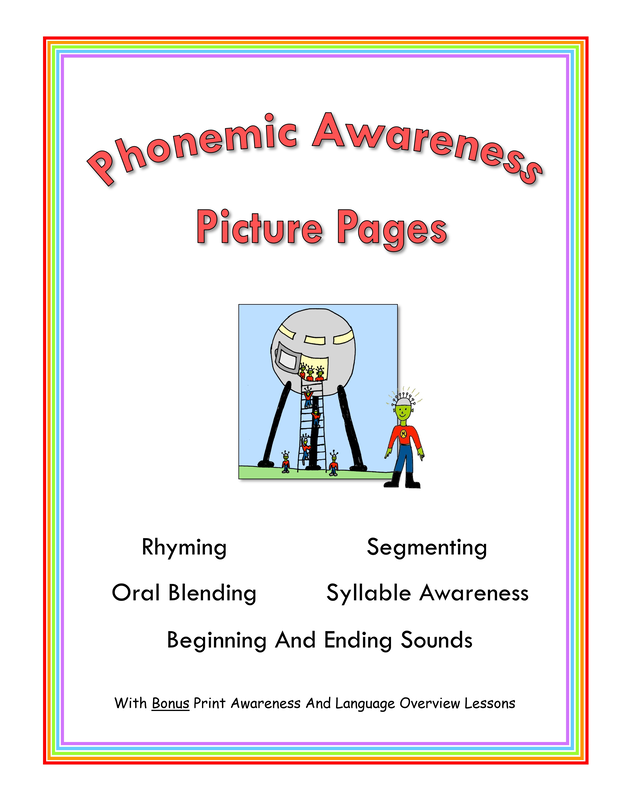
Phonemic Awareness Picture Pages
|
What Other Materials Are Used At Level 1?
|
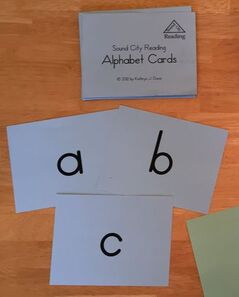
Flashcards
Alphabet Cards - Capital And Lower Case Sound Picture Cards Cards With Both Alphabet Letters And Sound Pictures |

|
|
Learning Games
Alphabet Lotto Apple Alphabet Game Apple Concentration Game Plastic Letter Match Letter Shapes |
Apple Alphabet
|
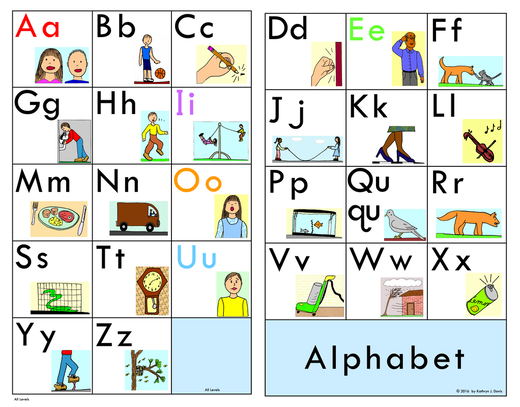
Wall Charts
Large Alphabet Chart
Large Alphabet Wall Cards With Handwriting Models
Large Alphabet Chart
Large Alphabet Wall Cards With Handwriting Models
Day 1 Teaching Sequence For The Letter N n
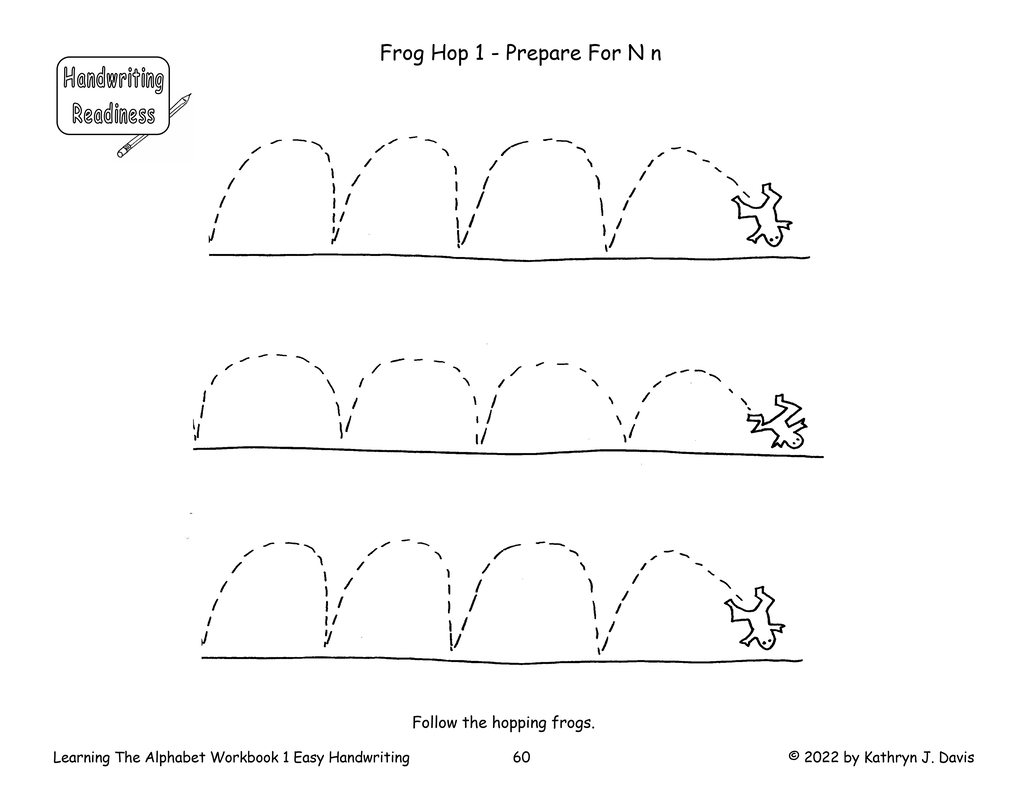
1. Handwriting Readiness Page
|
Students develop pencil skills by completing handwriting readiness picture pages. Each page provides practice drawing a stroke that will be needed to write a new letter. There are one or two picture pages for each letter. As students progress through the program, it will become easier for them to form new letters, because many of the letters will contain strokes that they have already learned.
|
|
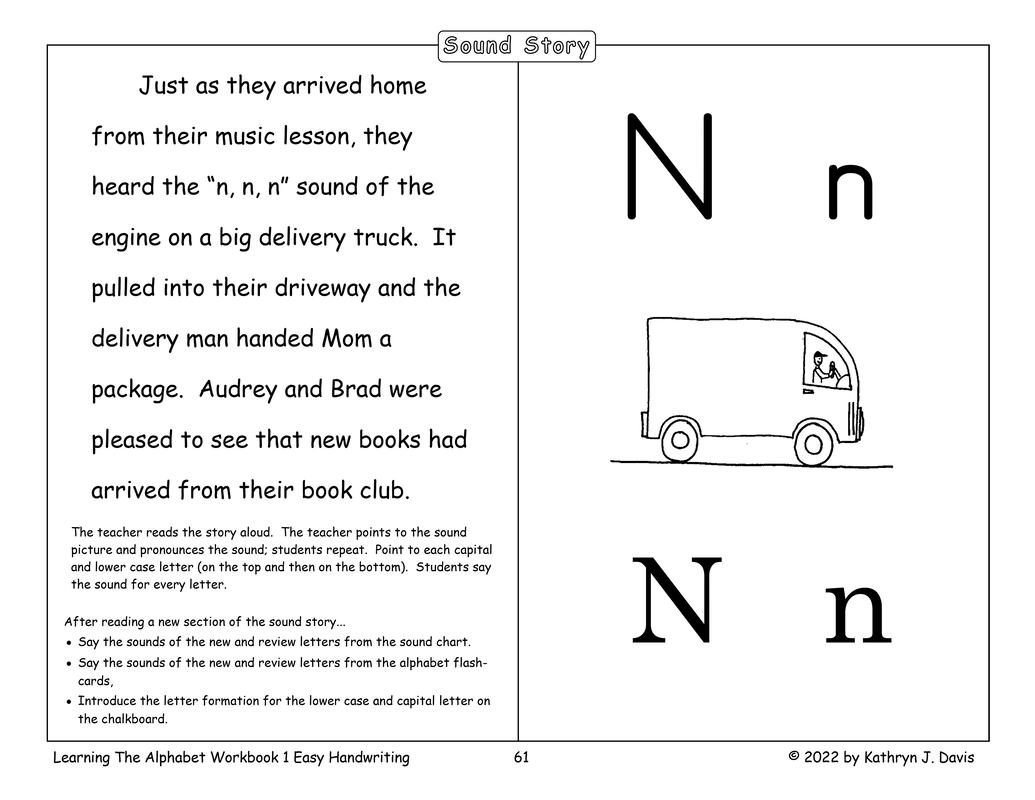
2. Sound Story Page - Letter Introduction
|
The alphabet letters are introduced with a sound story. The letters are taught in the sequence in which they appear in the story. The pictures in the sound story represent the speech sounds used in the English language. It is important to note that the sound pictures do not have the same function as key words. They represent the actual sounds that occur in the story. For example the sound shown by the picture of a delivery truck is /nnn/, the sound of the engine. The dog growls and the sound is /rrr/.
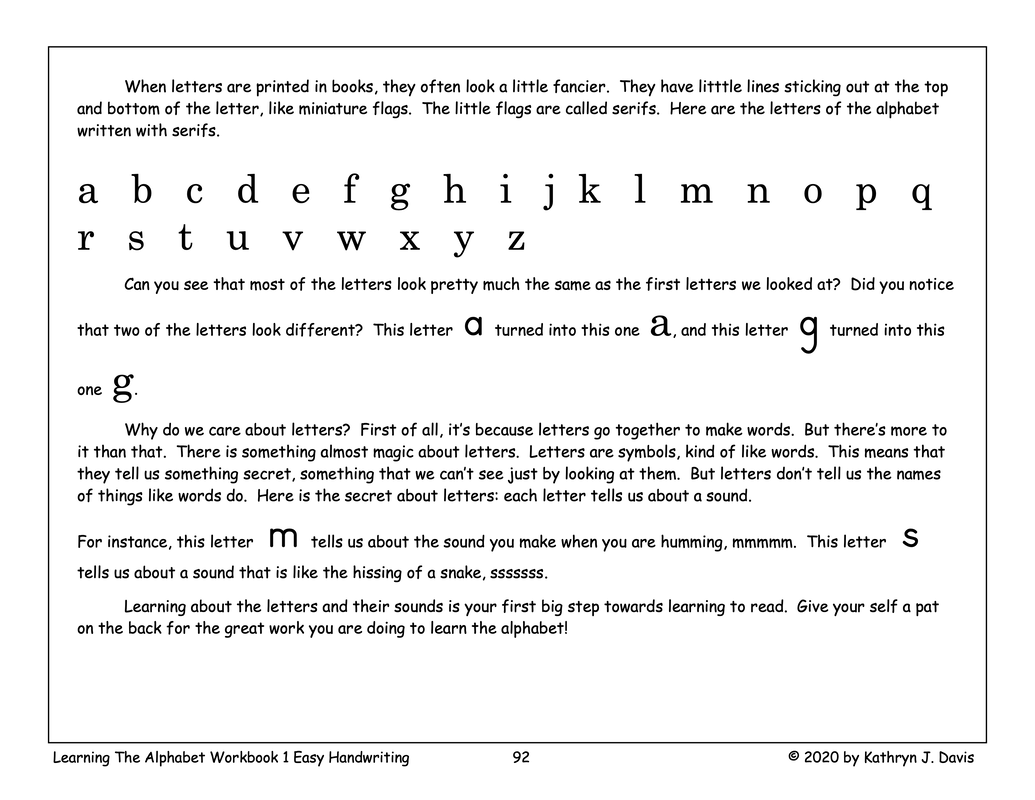
The teacher reads a new section of the sound story aloud for each new letter, emphasizing the sound for the new picture. The picture is shown with the capital and lower case letters that represent that sound in words. The letters are shown in two different fonts. This will help students recognize the letter when it is hand written and when it is printed in a book.
|
Click on the picture to enlarge it.
|
During this lesson, the learning sequence for the students is: Sound > Sound picture > Letter name > Letter sound.
- The story section, which includes the new sound, is read aloud by the teacher.
- The teacher points to the sound picture and explains that this picture shows the sound from the story.
- The teacher tells students the name of the new letter.
- The teacher explains that the sound represented by these letters is the same as the sound from the story, shown by the sound picture.
Why Are Letter Sounds Emphasized More Than Letter Names In This Program?
Students learn both the letter names and the letter sounds in this program. However the letter sounds are emphasized in the daily activities. Students say the letter sounds, not the letter names, from the alphabet chart and alphabet cards as a review each day. Why is it so important for students to say just the letter sounds during these review periods and throughout each day's lesson?
- It Helps Students Read Phonetic Words - When students begin to read words, they will say the sound for each letter in the word, going from left to right, to pronounce the word. This process is called decoding. When students look at each letter, the sound must come to mind immediately and automatically instead of the letter name. If students practice saying the letter names from the alphabet chart and alphabet cards, they will think of the letter name for each letter when they begin reading words. Saying the letter names does not form the correct pronunciation of the word. For example, to pronounce or read the word cat, the student should say /c/ /a/ /t/, putting the letter sounds together smoothly. (Letters between slash marks indicate the letter sounds.) If the student sees the word cat and says "cee-ay-tee" that does not sound like the word cat. By saying the letter sounds, students are able to read words phonetically. Eventually they will be able to read thousands of words in this way, even if they have never seen the words before. On the other hand, if students think of the letter names when they read, they will be learning the words by rote memory, making the reading process much more difficult.
- It Helps Students Spell Phonetic Words - At level two, students will learn to write the letters of the alphabet on lined handwriting paper. During a daily dictation period, students will write each letter when give the sound by the teacher. Students will repeat the letter sound as they write each letter. This prepares students to spell phonetic words. When students learn to spell words in this program at level three, they will say each sound in the word, one at at time, while writing the letters (or letter patterns) that represent those sounds, going in order from left to right. The way that the word is pronounced provides the information the student needs to spell the word.
- It Streamlines The Process Of Reading And Spelling Words, Which Is Essential For Many Students - If students are taught to say both the letter name and sound when they study/review the alphabet letters, they will have to screen out the letter names when they read or spell words. This creates a multi-step process. Students see a letter, think of its name and sound, remove the letter name mentally, and say the letter sound. Some students are able to do this comfortably. Other students find it almost impossible to do this type of mental screening, creating a severe roadblock when learning to read and write.
3. Letter Sound Review Using An Alphabet Chart
After hearing the new sound story page, students say the new and review letter sounds from the alphabet chart on the back cover of the book or from the larger wall chart. The teacher points to each letter going in alphabetical order, skipping the letters that have not yet been taught. The students say the sounds in unison. If students forget a letter sound, the teacher points to the sound picture to help them remember. If necessary the teacher models the correct sound and the students repeat it.
This is the back cover of the Learning The Alphabet Books.
|
|
4. Letter Sound Review Using Flashcards
|
The teacher shows flashcards for the new lower and upper case letter. Each student says the sound individually. Then the teacher shows all of the lower case letter cards that have been taught. Students say the sounds in unison. If students forget a sound, the teacher models it and the students repeat. The cards are shown in the order in which they are introduced in the sound story. Review the lower case letters daily. Review the capital letters on a regular basis.
Saying the letter sounds from flashcards is more difficult because students are not able to see the related sound picture as a cue. If students can't remember the sound for some of the letters, the teacher models the sound and has the students repeat it. The teacher places the unknown letters into a separate stack of "letters that need more practice." The teacher should praise the students daily as the stack of "known letters" becomes larger then the "unknown" letters.
|
Lower Case Alphabet Cards
|
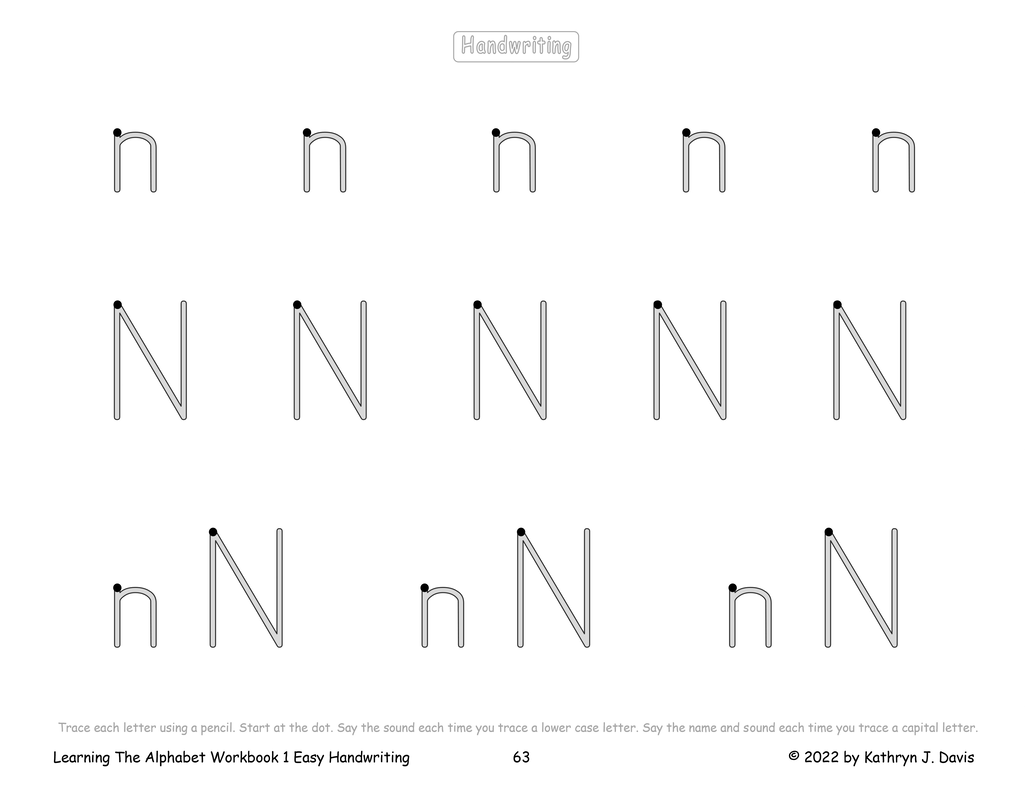
5. Handwriting Introduction For The New Letter On The Chalkboard
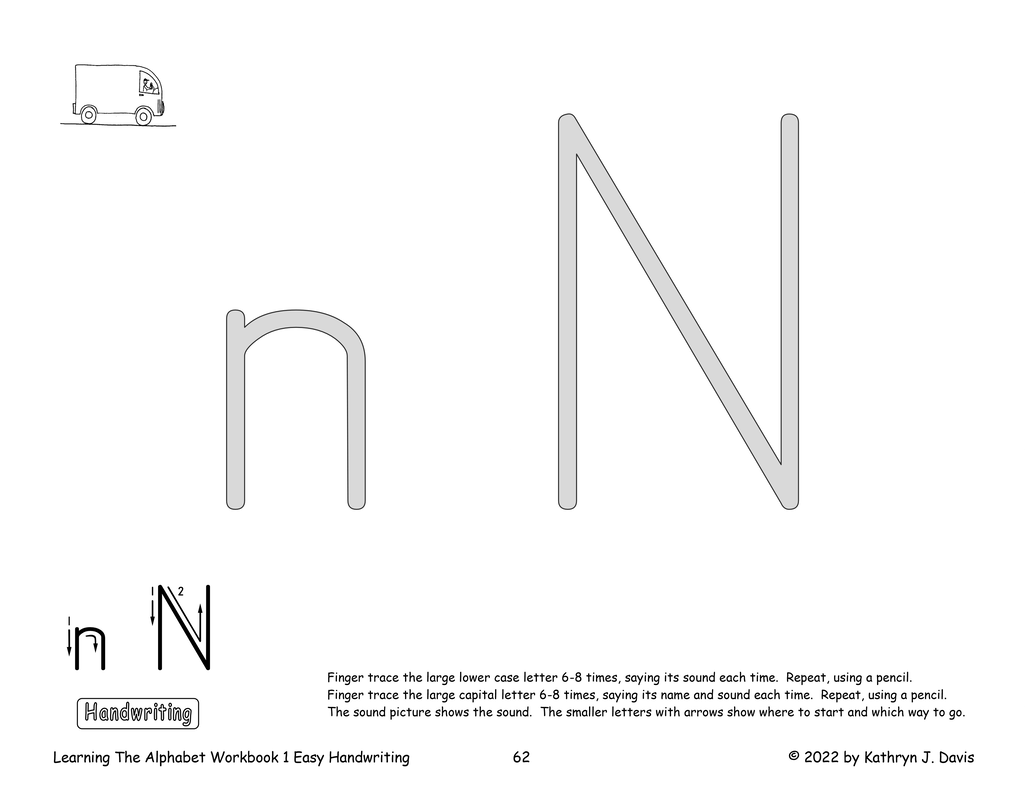
The teacher models how to write the new lower case and capital letter on the chalkboard, explaining where to start, which direction to go, and where to stop. Then the teacher traces the letter one time while saying the sound for the lower case letter or the name and sound for the capital letter. Students come to the board in small groups to trace large lower case and capital letters many times. Like the teachers, students say the letter sound each time the lower case letter is traced, "/n/." They say the letter name and sound each time the capital letter is traced, "Capital N, /n/."
This is a multisensory process that helps students remember the letter shape, its sound, and the muscle movement needed to write it. Students see the letter, use their finger and arm muscles to trace it, use the muscles in their mouth, chest, and voice box to pronounce the letter sound, and hear the sound with their ears, all at the same time. This approach promotes not only handwriting skills but also letter recognition, sound-symbol association, spelling skills, and word recognition skills.
6. Students Trace Large Letter Outlines In Their Books
|
After tracing the new letter on the board, students finger trace the new lower case and capital letter on large letter outlines in their books, then trace the same letters with a pencil. The finger tracing and pencil tracing is done multiple times just as it was done on the chalkboard. Students say the letter sound each time the lower case letter is traced, "/n/." They say the letter name and sound each time the capital letter is traced, "Capital N, /n/." The teacher moves around the room to assist as needed.
|
|
This is the stopping point at the end of day one of instruction for the letter N n. Day two of instruction begins below. The teacher should feel free to adjust the daily schedule as needed.
Day 2 Teaching Sequence For The Letter N n
1. Letter Sound Review Using An Alphabet Chart
The teacher points to each letter that has been taught on the alphabet chart, going in alphabetical order. Students say each sound in unison.
2. Letter Sound Review Using Flashcards
The teacher shows each letter card that has been taught, in the order in which the letters are introduced in the sound story. Students say each sound in unison.
3. Students Trace Large And Small Letter Outlines In Their Books
|
On the second day, the teacher models how to write the new capital and lower case letters again on the chalkboard. Student retrace the large letter outlines in their books in the same way as before. Then students trace the smaller letter outlines, with continual guidance from the teacher. They will trace a row of lower case letters, a row of capital letters, and a row with both lower case and capital letters. Each time students trace, regardless of the size of the letter, they will say just the sound for the lower case letter, /n/, and both the name and sound for the capital letter, capital N, /n/.
|
|
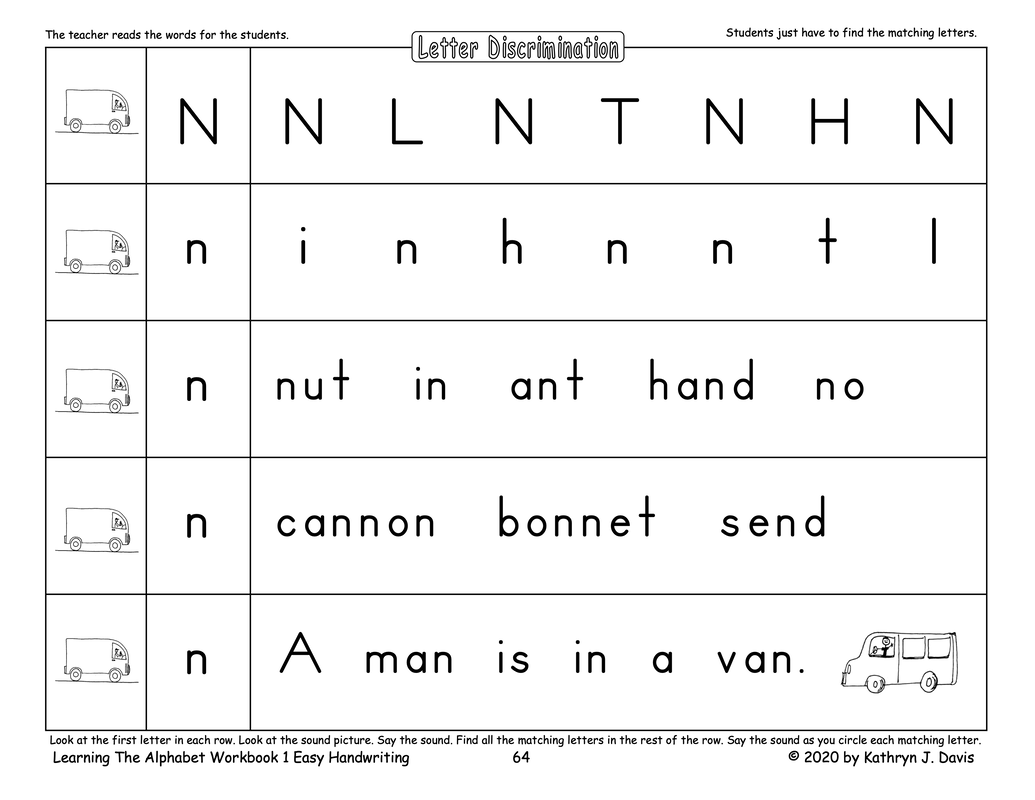
4. Letter Discrimination
|
On this page students look at the new capital or lower case letter at the beginning of each line, and then find and circle exactly the same letter going across the line. They are learning to distinguish the new letter from other letters. Have students say the sound each time they circle a letter. The sound picture for the letter is shown at the beginning of each line to help students remember the letter's sound. Guide and assist the students as needed.
In the first row, students find the capital letter.
In the second row, students find the lower case letter. In the third row, students find the lower case letter in one-syllable words. In the fourth row, students find the lower case letter in two-syllable words. In the fifth row, students find the lower case letter in a short sentence. Be sure to read the words and sentence aloud to the students. This is a visual discrimination exercise. Students are not expected to read the words. |
|
3. Oral Blending Exercise
|
This page is used twice - first to do an oral blending exercise with the whole group, and later to do a segmenting exercise during small group rotations with the teacher. These are phonemic awareness exercises that prepare students to read and spell words. Phonemic awareness is the ability to hear and manipulate the sounds in words. Phonemic awareness exercises are done verbally. Students do not see or use letters.
The term oral blending means putting separate sounds together smoothly to form a word.
This program combines picture pages with the oral blending exercises. Students listen to the teacher pronounce individual syllables or letter sounds. They put the syllables or sounds together mentally to form a word, then find the picture that illustrates that word.
The teacher goes through the items on the page in random order. The word for each picture is shown in the box with the picture. The words are separated to show the individual syllables or the individual sounds, like this, dog...house, ham...mer, c ..a. .t. The teacher pronounces each syllable or letter sound separately, with a slight pause between them. Be sure the sounds are completely separated. Say “c...a...t.” Not “ca...t” and not “c...at.”
The teacher can call on individual students to find the picture and say the word, taking turns. Students repeat the word in unison. Don’t let students mimic you by saying the separate sounds at this point. If someone separates the sounds, remind that person to “Say it fast.” Students mark each picture following the teacher's instructions, for example they may underline or circle the picture.
Make sure students know you will help them find the right picture if needed. In some instances they may be having trouble putting the sounds together mentally. In other instances, the word may not be in their speaking vocabulary, and you will have to explain it. This is a good way to expand vocabulary. The important thing is that students are comfortable and feel safe attempting a new task, knowing that they have your constant support.
|
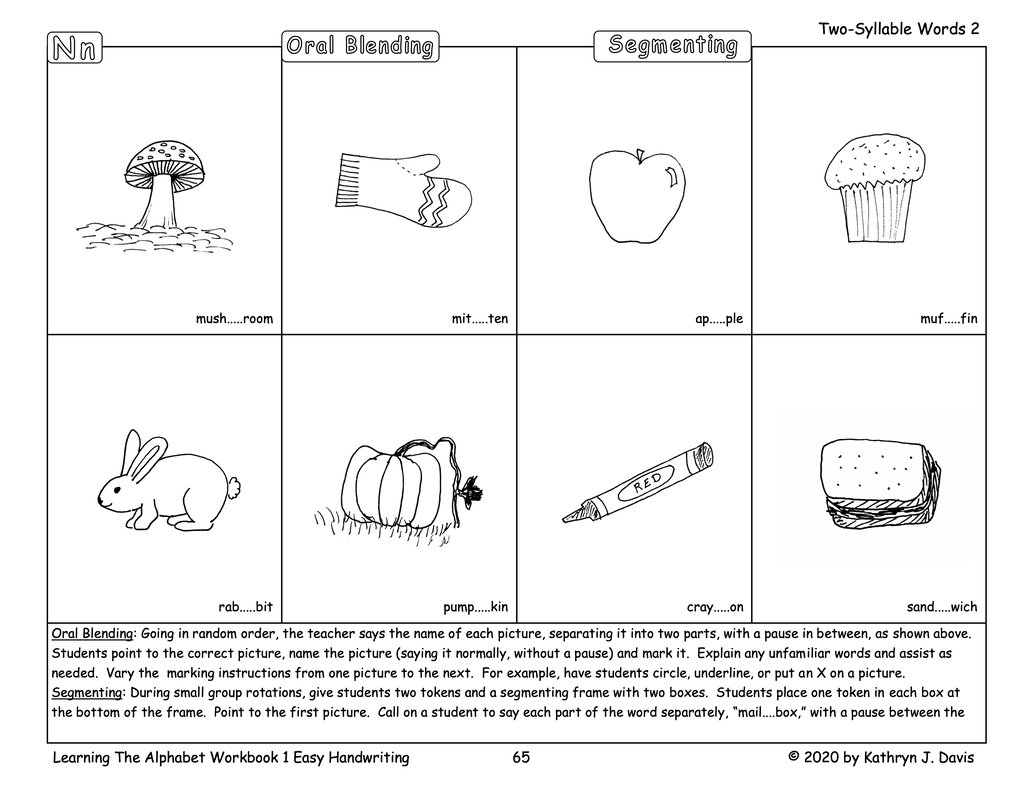
The exercises progress from easier to harder. On the first pages, students hear the separate syllables in two-syllable words. “Find rain......bow.” This is usually an easy task. On the next pages, students listen to the individual sounds in two-sound words. “Find ea......t.” “Find n.....o.” This is more difficult. After that, students listen to the sounds in three-sound words. These pages are the most challenging.
If students have trouble, try eliminating the pause between the sounds. Say the word slowly, stretching it out. The vowel sound and some consonants (called continuous consonants) will be easy to hold when stretching out some words, as in “fffaaaannnn.” Other the consonants (stopped consonants) cannot be held when they are pronounced, for example “caaaaat.” Be sure to pronounce these consonants clearly so that they can be heard. After students have caught on a little better, go back to saying the separate sounds. If students continue to have trouble, help individually as needed. They will practice oral blending again when they begin Exploring Sounds In Words. If they don’t master the two and three-letter words now, they will be able to try again at the next level. Additional two-syllable oral blending pages can be found near the end of the book. They may be used in place of the two and three sound pages if needed.
|
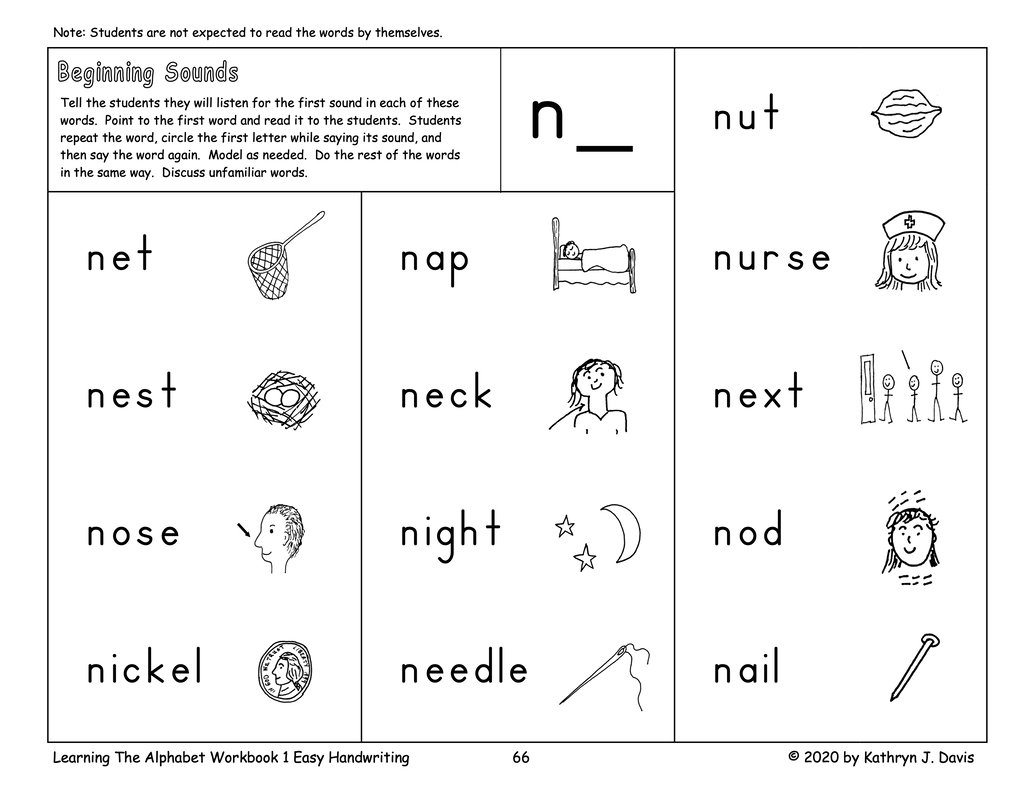
4. Beginning Sound Awareness
|
This page has a list of words starting with the new letter, with a picture to illustrate each word. As you work through the page with the students, they will begin to understand that the first letter in a word shows the beginning sound in that word. Students are not expected to read the words for themselves.
Read one word at a time to the students, going down the first column. Pronounce the first sound in the word clearly. Have students point to the word and repeat it in unison. Say the word again slowly, emphasizing the first sound. Ask the students if they can hear the first sound. (This can be difficult for some students and requires patience.) Have students circle the first letter in the word, saying the sound as they circle it.
Point out the picture that illustrates the word. If necessary explain its meaning. You might want to call on a student to use the word in a sentence.
|
|
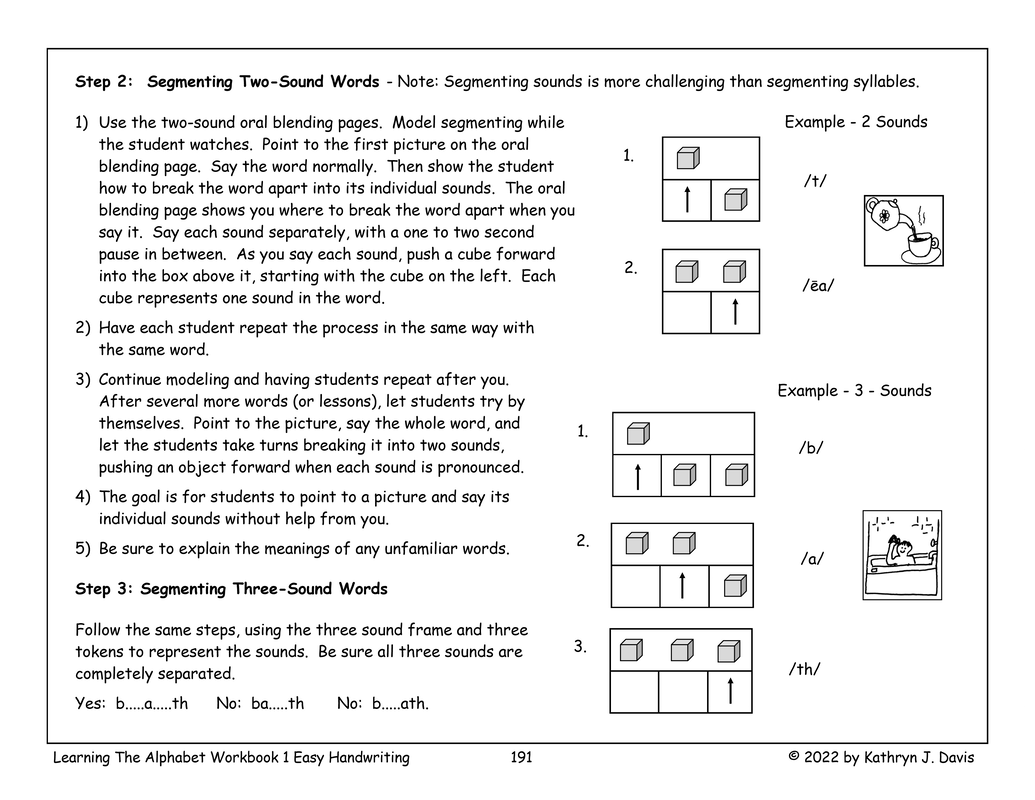
5. Segmenting Exercise
|
This exercise is done at a table with the teacher during small group rotations. The page used for the oral blending exercise will be used again. The activity is scheduled to be done on day two. However, if preferred, it could be done on day three instead, depending on whether or not review pages or print awareness lessons are done on day three.
Segmenting is the opposite of oral blending. Instead of putting separate sounds together to form words, students hear whole words and separate them into their individual sounds. To make this skill easier to learn, the first segmenting pages show two-syllable words. On these pages, students separate the words into syllables. After that students segment two-sound words, followed by three-sound words.
Segmenting is done orally, but small cubes or other tokens are used to provide hands on reinforcement for the students. Each student in the group and also the teacher will have a segmenting frame and the appropriate number of tokens, depending on whether they will be working with two-syllable or two-sound words or with three-sound words.
|

During the activity, the teacher models how to say each part of the word separately while pushing the tokens from the bottom part of the frame to the top, one at a time. To get started students watch and repeat with their own tokens, one student at a time. After getting warmed up, the teacher can call on a student to do the segmenting first. Then the rest of the group segments the same word again, all together. The teacher can adjust as needed.
|
These are the instructions for doing the segmenting activity. Click on either page to enlarge it.
|
|
This is the stopping point at the end of day two of instruction for the letter N n. Day three of instruction begins below. The teacher should adjust the daily schedule as needed.
Day 3 Teaching Sequence For The Letter N n
1. Letter Sound Review Using An Alphabet Chart
The teacher points to each letter that has been taught on the alphabet chart, going in alphabetical order. Students say each sound in unison.
2. Letter Sound Review Using Flashcards
The teacher shows each letter card that has been taught, in the order in which the letters are introduced in the sound story. Students say each sound in unison.
3. Students Trace Small Review Letters In Their Books
|
Students trace the lower case letters that they have learned. Remind students that they will start at the dot. The teacher should demonstrate how to form each letter on the chalkboard as a review just before students trace that particular letter. Explain where to start, which direction to go, and any other details needed to form the letter. Students say the sound for each letter as they trace it. The teacher should move around the room and assist students as needed.
|
|
2. Rhyming Exercise
|
On this page, students will learn to identify rhyming words. This is an oral exercise paired with pictures. Students do not actually see the words. There are five pictures at the top of the page and five pictures at the bottom. Each picture in the top row can be matched with a rhyming picture in the bottom row. Start by naming each picture on the page. Then start with the first picture on the top row. Ask students to find the rhyming picture on the bottom row. Remind students that rhyming words sound the same at the end of the word. Have students draw lines to connect the rhyming pictures. Continue until all the pictures have been matched.
If students get stuck on a picture, follow this routine. Point to the top picture and say the word. Then point to each picture in the bottom row and say the word, emphasizing the end of the word, going from left to right. Often students will be able to hear the rhyme when you get to the correct picture. If not, try the following routine.
Point to the top picture and say it. Point to the first picture on the bottom and say it. Say the top picture again. Then say the next picture at the bottom. Continue in the same way pairing each top picture with each of the pictures going across the bottom until students identify the rhyming picture.
|
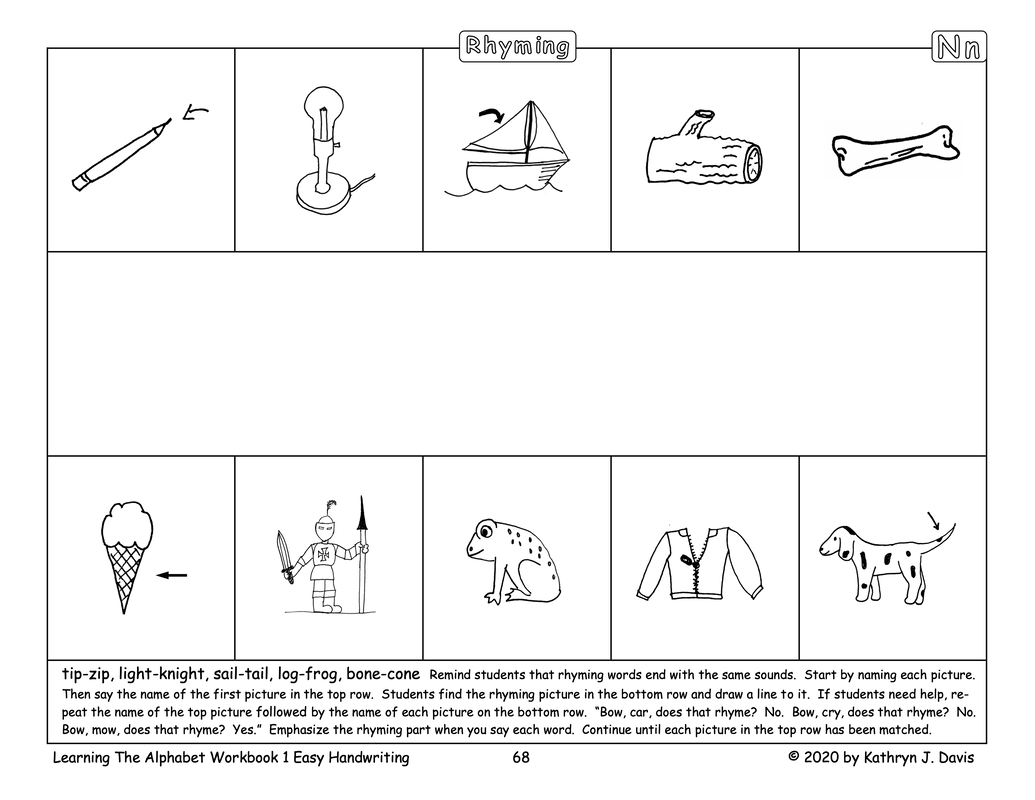
If all else fails, identify the rhyming picture and say both words, emphasizing the ending part of word. Have students repeat. Go on to the next picture. The students’ ability to detect rhymes will improve in time.
If students do not respond well with the rhyming word pages, you can skip them. Students will study rhyming words at level two.
|
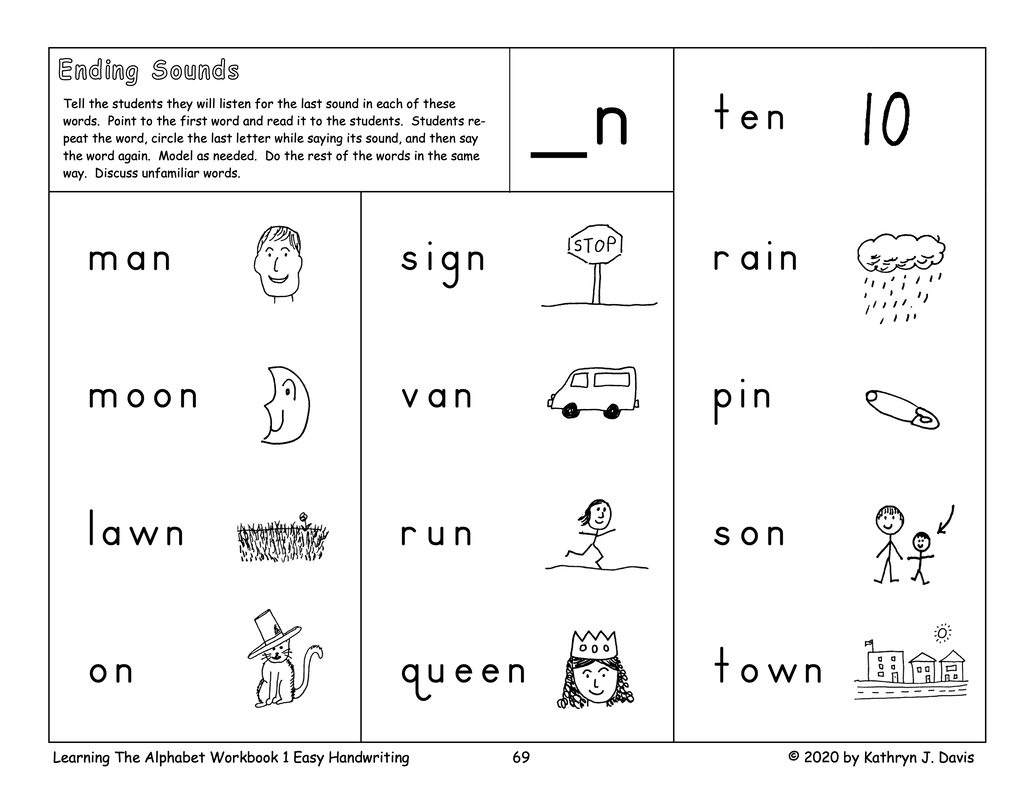
3. Ending Sound Awareness
|
Tell students they will be listening for the last sounds in these words. Explain that every word ends with the same sound. Read each word to the students, one at a time, emphasizing the ending sound. Students repeat the word, circle the last letter, and say its sound. Students are not expected to read the words. Explain any words that are unfamiliar.
Students may have difficulty with the concept of ending sounds. Be patient and supportive. If students are not showing an understanding of these pages, skip them at level one. Ending sounds will be reintroduced at level two. You can keep these level one pages and add them into the lessons while students are working through level two.
|
|
Additional Day 3 Exercises - These pages are done only after certain letters are taught.
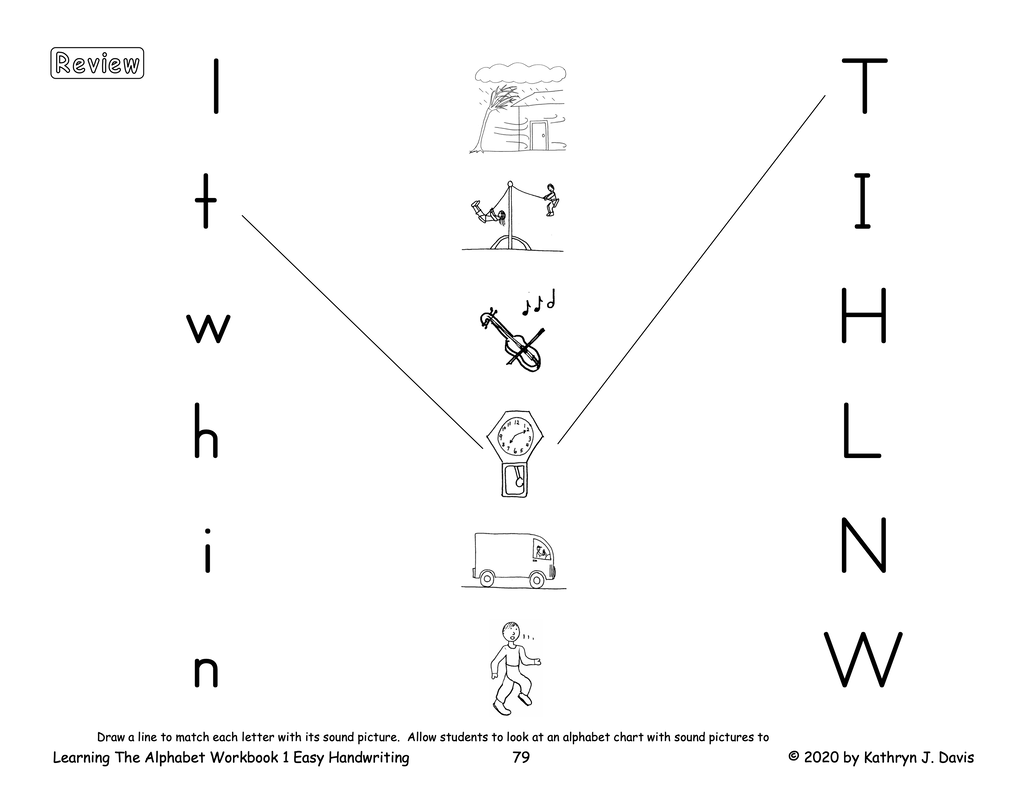
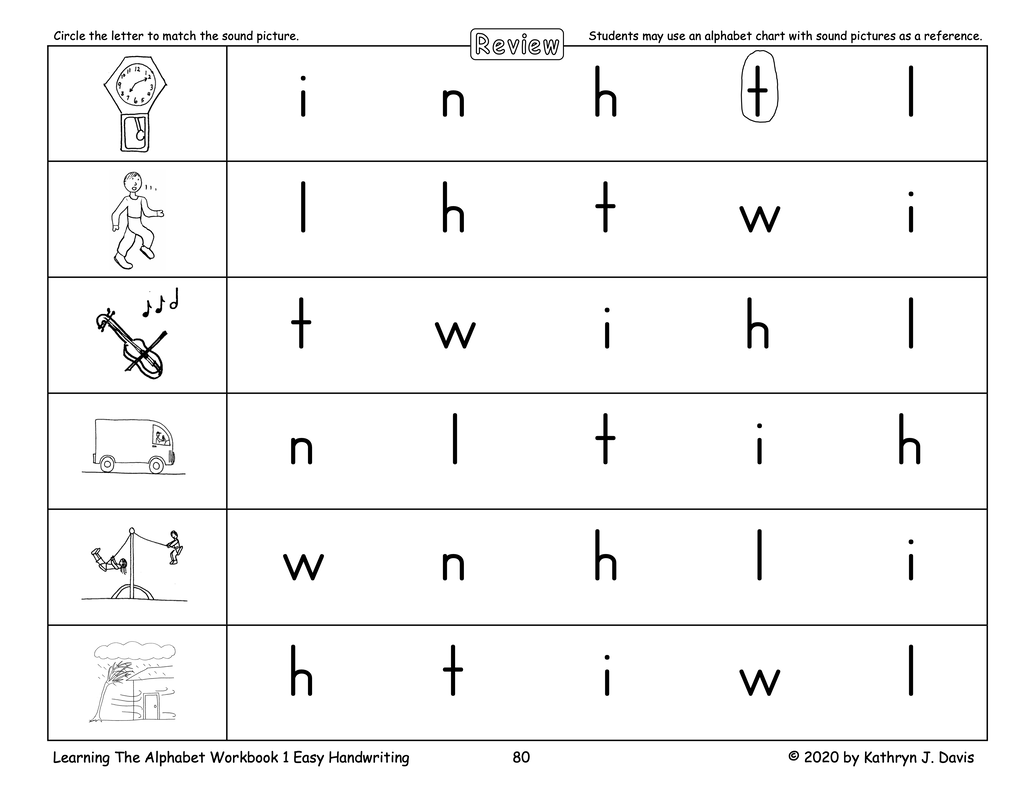
4. Two-Page Alphabet Review - Included after each group of six letters have been taught
After each group of six letters has been taught, you will come to two letter review pages. On the first page, students draw a line from each capital or lower case letter to the matching sound picture. On the second page, students will look at the sound picture at the beginning of each row, say the sound, and circle the letter that represents that sound. The teacher should work with the students and provide assistance as needed.
|
|
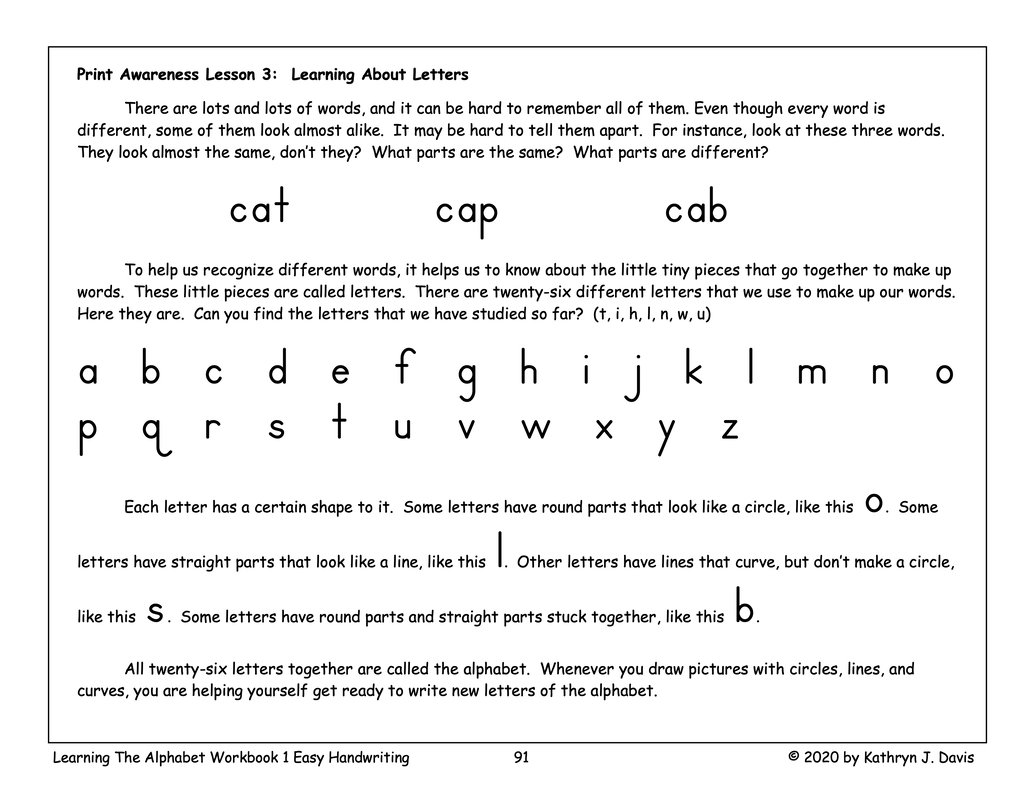
5. Print Awareness Lesson - Four lessons are taught in each book.
There are eight print awareness lessons that will be read aloud to the students by the teacher. There are four in book one and four in book two. These lessons teach print conventions to the students along with an introduction to the phonetic nature of words. The topics are listed below. Click on the pages shown below to enlarge them.
|
Book 1
1 - Learning About Words 2 - How Words Are Arranged On The Page 3 - Recognizing Words 4 - Learning About Letters |
Book 2
5 - Letters Have Names And Sounds 6 - How We Speak - Making Sounds To Say Words 7 - Words Are Made Of Sounds, Letters Show Us Those Sounds 8 - More About Letters In Words |
Sample Print Awareness Lesson Taught After Students Study The Letter N n
|
|
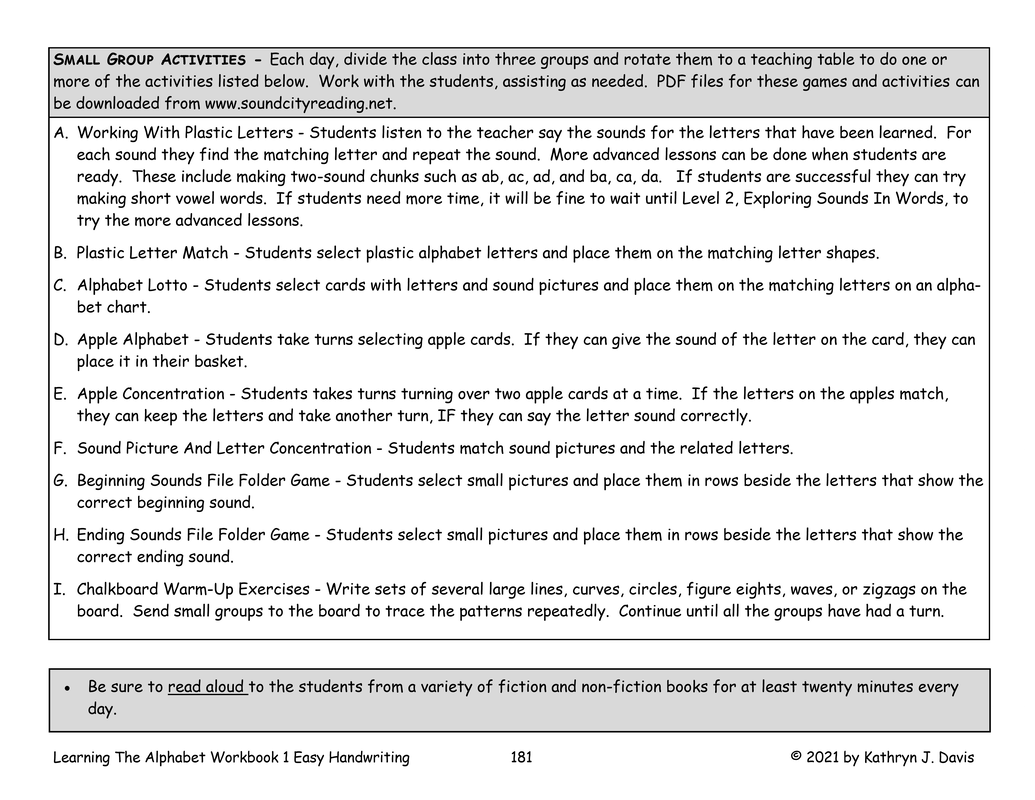
Small Group Activities
Each day, divide the class into three groups and rotate them to a teaching table to do one or more of the activities listed below. Doing these activities and games will increase student attention, enthusiasm, and mastery. Work with the students, assisting as needed. PDF files for the games and activities can be downloaded from www.soundcityreading.net.
Students who are not working with the teacher should be given independent activities, such as an art station, a construction area with blocks or other building sets, tubs of small plastic animals or vehicles, an area with children's picture books, a puzzle table, and so on. It is important for students to learn to work calmly and quietly while you are teaching the small groups.
- Working With Plastic Letters - Students listen to the teacher say the sounds for the letters that have been learned. When they hear each sound they find the matching letter on their work mat, move it to the bottom of the mat, and repeat the sound. More advanced lessons can be done when students are ready. These include making two-sound chunks such as ab, ac, ad, and ba, ca, da. If students are successful they can try making short vowel words. If students need more time, it will be fine to wait until level two, Exploring Sounds In Words, to build the two-sound letter combinations and three-letter short vowel words.
- Plastic Letter Match - Students select plastic alphabet letters and place them on the matching letter shapes.
- Alphabet Lotto - Students select cards with letters and sound pictures and place them on the matching letters on an alphabet chart.
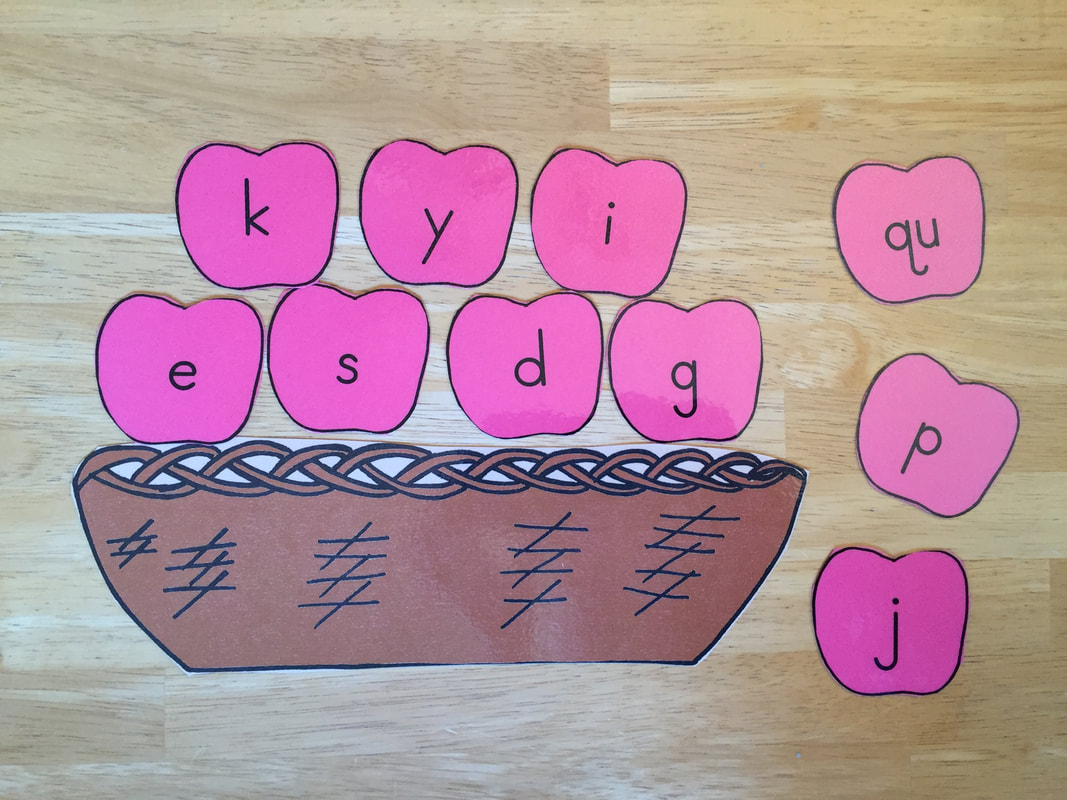
- Apple Alphabet - Students take turns selecting apple cards. If they can give the sound of the letter on the card, they can place it in their basket.
- Apple Concentration - Students takes turns turning over two apple cards at a time. If the letters on the apples match, they can keep the letters and take another turn, if they can say the letter sound correctly.
- Sound Picture And Letter Concentration - Do this exercise using the alphabet cards and sound picture cards that have been introduced. It works well to place the cards in a pocket chart but you could also work on a large table. Students match sound pictures with the related letters.
- Chalkboard Exercises - Write sets of several large lines, curves, circles, figure eights, waves, or zigzags on the board. Let each small group go to the board to trace the shapes repeatedly.
Reading Aloud To The Students
It is necessary for the teacher to read aloud to the students for at least twenty minutes a day from a variety of fiction and non-fiction materials appropriate to the their age level. Students will develop listening comprehension skills, an understanding of various types of written materials, and a broader vocabulary as they listen. They will also experience the joy that comes from hearing a good story and learning about interesting topics in the fields of science and social studies.
Thoughts About Handwriting Instruction For Young Students
There is a conundrum involved when teaching the alphabet to young children. On one hand, they are still in the process of developing eye-hand coordination and fine motor skills, making it a challenge to teach handwriting. On the other hand, learning to write the letters is a multisensory process that helps students learn the alphabet and is also important skill which prepares students to read, spell, and write. Furthermore, without early handwriting instruction students often begin copying letters on their own. This can lead to inefficient letter formation habits, which makes written work in the long run more difficult as school demands begin to require both legibility and efficiency.
There are several ways to solve this problem, and they work well together.
- Young students are using their eyes and the muscles in their arms and hands together when they draw, paint, color, work with clay or dough, work puzzles, and build original creations with construction toys. These activities prepare students for writing and should be a daily part of the curriculum.
- Some letters are less complex and easier to write than others. If students study these letters first, guided by the teacher, they will learn to make the basic handwriting strokes, build motor skills as they learn, and develop confidence. Each new letter introduced lays the groundwork for more complex letters that are taught later. By the time the more complex letters are taught, students will be able to learn them more easily.
- Multisensory instruction can be used to make learning handwriting easier. Using this method, students hear a sound, say the sound, write the related letter, and see the letter they have written all at the same time. They trace large letters first, using the large muscles in their arms, and then trace smaller letters. This involves multiple sensory-motor pathways that work together to strengthen learning.
The Sound City Reading program makes use of all of these concepts. Students are given time to work with art and construction materials daily. Letters are taught one at a time, using multisensory techniques, with letters that are easiest to write taught first. Letters that are less common or more difficult to write are taught later.
Students in general benefit from this approach. However some students who have specific difficulties with eye-hand coordination, auditory processing, or visual memory particularly need this method to learn. Without it, they will struggle. If they receive the right early training, they are very likely to experience success.
Teacher Preparation
Practice The Letter Sounds - Pronouncing the letter sounds accurately will prepare students to spell and read words. To prepare to teach the students, teachers should listen to the sound story and the sounds for the letters of the alphabet on this site. Look under the audio and video headings on the menu to find the recordings. As you listen, practice saying the sounds.
It is important to pronounce the consonant letters without an added "uh" sound. For example, say /t/, not /tuh/. (Slash marks on each side of a letter or letter pattern indicate that you should say the sound, not the letter name.)
The pronunciations for w and qu may be different from what you have heard previously. In this program, w and qu are pronounced in a certain way so that when they are combined with other letters to form a word, the word will be pronounced correctly when it is read phonetically.
Study The Information For The Teacher In The Student Books - Study the sequence charts, lesson plans, and other instructions found at the end of the student books.
Prepare The Learning Games - Print and assemble the games used at level one so that they will be ready to use with the students during small group rotations. The games are available as PDF downloads. These games are very simple to play but they can create a high level of interest in the students. They are especially helpful with reluctant learners.
Games To Use At Level 1
Alphabet Lotto
Plastic Letter Match
Apple Alphabet Game
Apple Concentration Game
Letter Shapes
Games To Use At Level 1
Alphabet Lotto
Plastic Letter Match
Apple Alphabet Game
Apple Concentration Game
Letter Shapes
Obtain Plastic Letters And Prepare Work Mats - (Optional at level one.) Order enough small plastic letters to use with the games and activities that will be used with the students during small group rotations. They will be used with some of the games and they will be needed in a teacher led activity that helps students recognize the letters when given their sounds. How many you order will depend on how many students you will be working with at one time in the small group activities. Letters that are perfect to use with the level one materials are available from alphabetletter.com at a very reasonable price. You will also need to prepare work mats for the students by drawing a horizontal line across sheets of construction paper (placed in landscape position) to divide them into two equal sections. The number of work mats you need will depend on the size of your small groups.
Prepare Flashcards - You will need these sets of flashcards.
- Lower case letters
- Capital letters
- Sound picture cards from part one of the sound story.
- Cards that show both the alphabet letters and related sound pictures on the same card (Optional at level two.)
Obtain Children's Picture Books - These can be purchased new or used, or they can be checked out of the library on a rotating basis. The teacher will read these books aloud to the students to develop listening comprehension skills and and an interest in reading.